Monday, March 31, 2008
Wood is So Cool
Scalloping the Braces

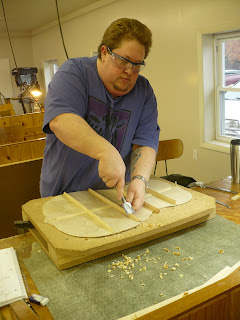

This is the process of taking the square braces and using a chisel to taper the ends down towards the edge of the guitar. Why? Well, one reason is to transfer the strength of the bracing all the way to the outside edge of the guitar. The braces have to be carved back to make room for the kerfed lining ( which you'll see tomorrow, probably) that gets glued all around the circumference along the top and back edge. These ends will be "tucked" into the kerfing which adds strength. This will be clearer when that process is done and I can post pics of it. Meanwhile, it's fun learning how to use the chisel more effectively. BTW, I am standing on a platform. These workbenches are a little high for me, and when the additional table is added on top of my bench... well, I needed help to reach across and have good leverage.
Saturday, March 29, 2008
Ah, My People...


Today, I went to hang out with two women from Grand Rapids Women's Choir... Janice lives near Big Rapids, and Cheryl lives in Lansing, but they go back and forth a lot to spend time together. Janice has a sweet A frame house on some beautiful partly-wooded, partly marshy land... with a little pond and streams running through. She has little resting spots and occasional benches or tables here and there, and the trails marked with stone cairns. We hung out in the skylighted house and talked and drank coffee... went for a really nice walk in the gorgeous sunny day with her dog, Tenor. Janice found a small skull of some creature with pointy canine teeth... possibly a coyote or bobcat... they're going to take it to a friend who is a vet to see if she can I.D. it. It was cool, tho. Came back for more conversation and then went out for Mexican food for dinner in town. They came over for a little while afterwards to see the guitar I'd built.
Very nice women...and lovely to spend time among my own kind... women-centered-women who sing, are feminists, enjoy each other and dogs and nature and value diversity... it's funny how you don't realize how hard you're working to fit in somewhere that doesn't fit until you are finally with people who don't expect or require that of you. It felt really good to relax with these fine women and I hope to spend more time with them.
Funny thing about Boyland...
Things are strange in Boyland.
On Thursday, when many of us were sanding our braces into that triangular shape, many of my classmates ended up sanding their thumbs bloody. The first one to do that, an older guy, and probably the biggest guy in the class, came over to me and showed me the bloodstain on his piece of wood, and showed me his wound
Then it occurred to me... this guy (older than I am, I'm sure) was just like a little boy showing me his boo boo. Go figure.
Also... there was an episode where one of the young guys was telling a story about going up in a helicopter (somewhere in the SW) and shooting coyotes. He was definitely bragging, and you could see that a couple of the guys were into it, but most of them were not. And said nothing. And then the same young guy talked about a video with a woman shooting some sort of high powered gun and having the thing kick back and hit her in the head, and how funny that was. And nobody said anything. Including me.
There was just no way for me to interject without being the humorless feminist. But I suppose I am.
Then Russ said that the first and only time he ever shot a gun, he had the scope up to his eye and it kicked back and gave him a black eye and he never felt the need to do that again. Which made the young guy shut up.
Apparently, that's how it's done in Boyland.
Attaching Back Braces


Time to attach the braces to the back. I didn't post pics of the process of putting on this back graft... it is a thin strip of spruce that is glued across the center seam, that reinforces that seam. That strip is then sanded to a slight dome, as you see in the picture. Then, based on the template that shows where the braces will go, notches are cut into the graft to make room for the braces to cut across them.
Then the braces are glued to the plate, and clamped in place. Here at the shop, we are using go-bar decks for clamping (in the picture). Essentially, this is a countertop, with a ceiling above it at a certain height, and sticks of springy wood that are bent and pressed in place, so the spring of the wood creates the clamping pressure. It is good for providing even clamping action across something being glued to a flat surface. But those springy pieces are tricky, and until you get the hang of how to apply them, they can sproing out and smack you in the head (like one did for me)... or kick your brace over and leave a nasty gouge in it. Takes some getting used to! I got very frustrated with this part... Russ heard me cursing and came over to help me...
BTW... that fiberboard piece that it is sitting on is a radiused dish... the same radius as the braces are curved to... which ultimately helps to create the radius shape of the back.
Friday, March 28, 2008
Final Bending and Blocks...
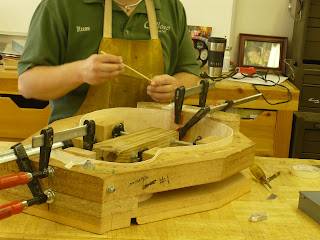


Sorry, this is out of sequence... I was working on the parabolic sanding entry, and realized I'd skipped this part. Not sure how to re-sequence the posts, so... just remember that this part comes before the parabolic sanding,.
Truth is, a lot of things are happening at once right now, so the sequencing may be a little off in general...
Anyway, Even with the side bending presses that we used, some final adjustments are made by hand using a bending iron. Russ, the instructor, is doing this for us... it is very very tricky and we don't have time for all of us to learn (and mess it up, and try again) and still get done with our instruments on schedule.
Anyway, once it's been bent to fit the mold, it is held in place while the neck block and end block are clamped and glued in.
Parabolic Sanding


Because the tops and backs are going to be radiused, there is a need to make the surfaces to which they will be glued MATCH that radius. How to do that? Many ways, but here they have a parabolic sander. What the heck is that? It's a dish that's domed to the proper radius and covered with a sanding surface. The sides of the guitar, along with the neck block and the end block (to which they are glued) are held in place by a mold, and the dish spins underneath it, sanding all the surfaces (the blocks and the edge of the sides) to the proper radius. Cool, huh?
Shaping Braces


So in order for a guitar to resonate, the top (especially) and back plates have to be able to vibrate... so they're very thin. But in order to support all the pressures (particularly of the strings) that bear on those plates, they need reinforcement. That's where bracing comes in.
The braces serve several purposes... one is that they keep the plates from caving in. Another is that the placement and size and shape of the braces affect tone. Another is that they help create the structure of the instrument. For structural and tonal reasons, most guitars (even the ones that look flat) have a radius (convex curve) built into both the top and the back. The way that's done is to radius the braces, and then the plate is glued to the curved braces.
So the braces start as a pile of what looks like kindling... spruce, which is light and strong. And the braces have to be cut to the right length, and then radiused to the proper arc. There is a nifty jig for doing this on the big upright belt sander (which I'm pretty sure has a different name, but there it is in the picture).
After that is done, the braces are shaped so that they're wide on that curved surface where they will meet the plate, and tapered to a peak. This is tricky to do, and is done on the flat/horizontal belt sander... but b/c the pieces get pretty thin, it's easy to sand off your fingernails (as I did... quick manicure!) or even nick your thumb (as several of my classmates did... they all had matching thumb bandaids today). So that's what you see in the third pic.
soundhole
Wednesday, March 26, 2008
Ring Around the Rosette


Towards the end of the day, we created the rosettes that will go around the soundhole. In the center of that spot is one of the locator holes... and there's a special jig for the drill press that is centered on that hole and has an arm that extends and holds onto a vertical blade of just the right width. Lowering that down carefully creates the cavity for the strips of purfling that make up the rosette. (the depth stop is pre-set so there's no chance of going through). That top pic shows the bit in action. That blurry bit in the middle... that's the thing revolving at very high speed.
After the cavity is made, it is coated (e.g. shmeared with a paintbrush) with a sealant that will keep the glue from seeping into the grain of the spruce and causing a stain. Then we took 5 pieces of purfling (thin strips of wood)... 3 black and two white, and alternated them in a sandwich and squeezed them into the cavity (3rd pic). Once that was done, we floated in some thin superglue and let it soak into the purfling. Tomorrow, we will sand it down flush with the top, which will also take off that excess glue and sealant.
Preparing the Pieces


So, this morning, we spent time thicknessing our top and back plates on that giant drum sander. I had my turn to bend my side pieces... and you see the result in the picture. This is not the final shape, but gets them most of the way there. The rest is done by hand on a bending iron.
We laid out our tops and back also, using the templates you see in the 2nd picture. This included making final decisions about which part of the grain and figure to incorporate... and whether to include/exclude flaws or irregularities in the wood, etc. The result is in the 3rd pic. The top, being spruce, is fairly even grained and visually plain at this stage. The back, however, is wild. Lots of figure, kind of rorshach-like, with some unusual flame in the maple, which will pop later.
We also drilled some locator holes... to help us line things up later.
Tuesday, March 25, 2008
The advanced students


Thought some of you might like to know what the advanced students are doing. After completing the journeyman course (2 mo... the course I'm taking) and building one electric and one acoustic guitar, those who stay for another 4 months get to make a classical guitar and an archtop. Here you see some work being done on the classicals. This week, they are putting binding and purfling around the edges. It's delicate, time consuming, and gorgeous when it's done.
I'll get some pics of the guys who are working on archtops and post them soon.
Bending

Today we also prepared our side woods for bending... we made one edge smooth and flat, traced the pattern and cut it out... and tomorrow we will get to bend them. What you see in the picture is a form and press with a heat blanket. The wood is sprayed with water, wrapped in tin foil, and then the blanket is heated up and the wood is pressed onto the form. I expect we will do some additional bending by hand on a bending iron... but this will get it roughed into shape.
Joining Tops and Backs


We started the morning by putting our pieces of top wood into the oven to toast most of the remaining moisture out.
Meanwhile, we examined our pieces of back wood and made decisions about which side would face out and which edges would become joined as the center seam. Many things factor into that decision... the grain, figure and flame of the wood...any flaws... etc. Then we used a big machine called a jointer, the job of which is to make an edge clean, smooth and 90 degrees.
We did the same thing when the top woods came out of the oven... and then we joined the two halves with good old Titebond wood glue using a rope clamp (in the picture). This is such a cool design... so simple, just a couple of wooden stretchers and some clothesline-like rope. The board is sandwiched between the stretchers. The rope is wrapped around one end... passed across the flat surface and pulled tight and wrapped around the other end... this process is repeated so that the rope goes across on both sides of the stretcher, front and back. Once it's all roped up... you make any final adjustments to the alignment (if you can, it's already tight)... and then push those stretchers into a wedge shaped angle, which creates the clamping pressure in towards the middle (horizontal) seam. Old world technology, and it works!
Oh, and "joining" tops and backs does not mean joining tops TO backs... it means putting the two bookmatched pieces of wood together to make the top and to make the back.
Acoustic Guitar in the Rough


Here are some of the raw ingredients for my acoustic guitar. Sitka spruce, Michigan maple, ebony chunks. The electric was made from some pre-fabricated parts... and a good place to start. But the acoustic is starting from slabs of wood. We got ours today and spent some time learning about wood selection and what to look for... and then started the process of thicknessing it on this giant drum sander.
The third pic is my guitar back, after a few passes through that machine... interesting figure and a little bit of flame too, I think... it'll show up more later.
Anyway, this part is really exciting for me, I have to say.
Electric Guitar completed!
 It's done, and awaiting evaluation and grading by the instructor. I'm looking forward to getting the feedback from that process... my sense is that I'm doing no better or worse than others in the class. But the specific info about what I should work on most, will be helpful.
Meanwhile... meet my new Telecaster...*(-:
Speaking of Boyland...
Today's observation is that in Boyland, you can wear an apron but only if it is made out of dark blue denim or leather. Boyland aprons never say "kiss the cook", nor would they ever be gingham.
Sunday, March 23, 2008
Ulali + GRWC

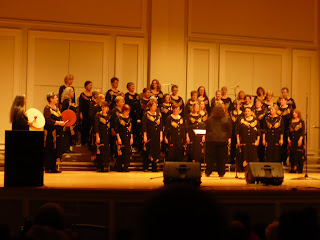

Bill decided to stay home while Shelley and I went to a really cool event... the Grand Rapids Women's Chorus had gotten a grant from the Nokomis Foundation and put together a program that featured two local groups of Native American women singers and drummers, performed two pieces themselves, and then highlighted a performance by the vocal trio, Ulali. They had a vending area featuring local Native American crafts people, and 3 speakers before the concert. Apparently, there had also been a choral workshop earlier in the day. The GRWC had clearly done its homework doing outreach to Native American communities in the area, because they were well represented in the audience.
One of the speakers talked about her efforts to revive and teach the Odawa language to others... it reminded me of recent efforts to revive Yiddish... although a big difference is that there is TONS of written Yiddish... books and plays and songs and newspapers, etc. The Odawa language is not written down, so its rescue is even more delicate and urgent. It is also spoken by fewer living people... so her teaching project is really important.
So the first pic is the Snowbird Singers from Mt. Pleasant, MI, which is pretty much due east of Big Rapids... and apparently they have a cool museum there re: the history of Native Americans indigenous to this area. The GRWC is next. And then Ulali...phenomenal vocal harmonies... so closely woven and expertly performed!
I got a particular kick out of the introduction made by the woman on the far right... who when introducing her tribal heritages, said that on her father's side she is of the Ashkenazi Nation... which cracked me up, but I think I might have been one of very few in the audience who got it.
Anyway... a few other things of note...
first... this even was in the same concert hall where the Sistersingers Network Festival happened about 7 years ago... when my singing group, SheWho, had just formed... and we essentially debuted at that festival. So it was really nice to be back in that hall, and to be recognized and welcomed by members of GRWC.
AND... there is a member of the choir who lives in Big Rapids, so I'm hoping to get in touch with her soon to hang out and talk choir stuff and get a different perspective on this town than what I get from Boyland.
Visiting Bill and Shelley
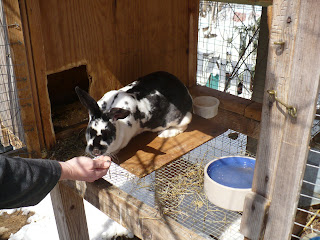


I had SUCH a nice day on Saturday... after sleeping late (yay!), I headed down to Grand Rapids to visit Bill and Shelley.
They are such warm and friendly people... very laid back and casual... I felt very much at ease and at home with them. We hung out, talked, played music, talked some more.
Shelley raises meat rabbits... She gave me a tour of her small rabbitry...the spotted one in the picture is her breeding doe. The dark one is one that they're keeping and not eating. Her motivation is about eating locally, organically, and that meat should come from animals that have been treated humanely. She used to get chickens from a local supplier... who stopped supplying and so she decided to do this. I'm pretty sure I couldn't do it myself... especially the butchering... but I respect the choice and the motivation. I think that those of us who eat meat ought to be more aware of what that actually means. And she cooked rabbit fajitas for us for dinner, and it was delicious.
Bill has a wonderful collection of instruments, and it was so much fun to sample and pass and play many of them, and to share my own as well. He plays guitar, mandolin and octave mandolin, like me. Shelley plays flute and pennywhistle and bodhran. Both are quite good. And both sing some too. I had a grand time. I hope they did too... and I certainly plan to visit them again and spend more time there. They are really good folks, and even though I was there for hours, we still did not get to say or play all of the things we wanted to.
They also have a sweet golden retriever named Clara... I miss my own dogs so much, it was nice spending time with her too.
Saturday, March 22, 2008
Final Touches and Set-up


Today was spend learning how to do all the final set-up stuff on the electric guitar. This included centering the neck, setting the saddle pieces (the adjustable metal pieces that the strings go into and disappear...in the pic) for proper radius and setting the intonation just right. Also finished setting the string spacing and notching the nut. Installed tuners and string tree. All the pieces. (left the electronics in place)
Oh.... and adjusting the neck relief... the truss rod adjustment is absolutely crazy on these... located at the end of the neck that meets the body, you kind of have to 1/2 take off the neck in order to adjust it... then re-attach and re-tune up to pitch in order to figure out if you adjusted too much or too little or just right. Apparently when Fender designed this, they were assuming necks would be disposable, and designed for ease of production, not for ease of maintenance! Anyway, that's what you see in the second pic.
Then when we were done... we were told to disassemble theso that we can do the final buff and polish. So that was for learning and practice, and we get to do it all again... this time putting on the decent strings. We are also cleaning them up thoroughly... making sure all the buffing compound is polished off, and that the polish is polished off. Then re-installing everything and getting it to its final set-up. This will be finished Monday morning .... and our guitars will be graded. They said that they grade really hard, and if we get between a B- and a C-, that's average and normal. I don't really care about the grade... I care about what I'm learning... and I'm very aware of all the ways in which this instrument is not quite perfect... a ding here, the stupid extra strap button hole, overfiled the nut, etc. OTOH... I'm really proud of this instrument, and have learned from each one of those imperfections. So...
Next week we start on our acoustic guitars. I'm very excited about that!
Friday, March 21, 2008
The Fix


Ok- so the blunder cannot be undone... but it can be patched. A thin dowel of wood trimmed to size and shoved into the drilled hole, then filled with thinned woodglue is the patch. After it dried, a black sharpie to stain it black. Is it visible? Sure, if you're looking. Is it noticeable if you're not looking for it? Not really. I'm going to consider whether or not to put lacquer over top.
While I was working on other things today, we were trying to brainstorm other ways to approach this repair... One idea was to put a little hook for "accessories"... maybe a key chain, a decorative tassel, fuzzy dice? Another was to put a phantom mini-toggle switch there or a red depressable button and just let people wonder what the heck it does. And if they ask... just say "whatever you do, DON'T flip that switch!".
Thursday, March 20, 2008
Even in Boyland...
Subscribe to:
Comments (Atom)


